Tampilkan postingan dengan label Tutorial. Tampilkan semua postingan

Jumat, 06 Juni 2014

chmod dan chown di ubuntu

Hari ini ane posting, pengalaman soal permission di ubuntu karena permasalahan hak akses yang baru ane alami. Okay deh sob.. chek this out... !
Tidak sedikit pengguna Linux yang mengalami kebingungan karena tidak dapat mengoperasikan suatu program atau mengakses sebuah file atau direktori dikarenakan oleh hak akses yang ada pada setiap file dan direktori yang ada pada Linux. Linux mengenal hak akses yang mengatur setiap user sehingga tiap user hanya dapat mengakses file-file atau direktori tertentu saja, hal ini digunakan untuk kepentingan keamanan sistem.
Dua perintah (program) dalam Linux yang digunakan untuk mengatur hak akses tersebut adalah chmod dan chown. Program chmod digunakan untuk mengubah hak akses suatu file, sedangkan chown digunakan untuk mengganti pemilik file tersebut.
Hak Akses dalam Linux
Sebelum melangkah lebih jauh mengenai penggunaan perintah diatas, sebelumnya perlu dijelaskan terlebih dahulu mengenai hak akses di dalam Linux. Setiap file dan direktori yang ada dalam sistem linux memiliki tiga buah hak akses, satu untuk user itu sendiri, kemudian untuk user dalam grup yang sama dengan pemilik file dan yang terakhir untuk user lainnya.
Anda dapat melihat hak akses sebuah file dengan menggunakan perintah ls l,
Perhatikan contoh dibawah ini:

-rw-rw-r– 1 postgres postgres 41527 Jul 12 2001 summary.pdf
drwxrwxr-x 2 postgres postgres 4096 Sep 20 2002 Suse
-rw-r–r– 1 root root 4935 Aug 23 2001 T123456.log
-rw-r–r– 1 postgres postgres 13335 Apr 10 17:04 tchart2.java
Karakter pertama menunjukkan jenisnya, jika berisi karakter d, berarti itu adalah direktori sedangkan jika kosong berarti file. Sembilan karakter berikutnya menunjukkan hak aksesnya, dengan tiga karakter pertama menunjukkan hak akses untuk user tersebut, tiga karakter berikutnya menunjukkan hak akses untuk grup nya dan tiga karakter terakhir menunjukkan hak akses untuk user lain.
Masing-masing arti karakter tersebut dapat dilihat pada tabel berikut:
Karakter Arti Nilai
r (read) Hak akses untuk membaca 4
w (write) Hak akses untuk menulis 2
x (exec) Hak akses untuk menjalankan 1
Dengan mengkombinasikan nilai pada masing-masing hak akses tersebut, akan didapatkan hak akses masing-masing, perhatikan tabel berikut:
Hak Akses Nilai Arti
— 0 Tidak memiliki hak akses (tidak dapat di akses)
r– 4 Dapat dibaca dan ditulis (diedit)
rw- 6 Dapat dibaca dan ditulis (diedit)
rwx 7 Dapat dibaca, ditulis dan dieksekusi (dijalankan)
r-x 5 Dapat dibaca dan dijalankan, tetapi tidak dapat diedit
–x 1 Hanya dapat dijalankan
Berikut contoh penerapannya:
Hak Akses Nilai Arti
  • rw——- 600 Pemilik memiliki hak akses baca dan tulis, sedangkan orang lain tidak memiliki hak akses apapun. Set dengan hak akses ini supaya file anda tidak dapat dibaca orang lain, biasanya digunakan untuk file-file dokumen
  • rw-r–r– 644 Pemilik memiliki hak akses baca dan tulis sedangkan orang lain hanya dapat membaca saja. Gunakan hak akses ini jika anda ingin orang lain dapat membaca file anda
  • rw-rw-rw- 666 Dengan hak akses ini, orang lain juga akan dapat membaca dan merubah file anda
  • rwx—— 700 Pemilik dapat membaca, menulis dan menjalankan file ini, hak akses ini yang biasanya digunakan untuk menjalankan program
  • rwxr-xr-x 755 Pemilik memiliki hak akses baca, tulis dan menjalankan file ini, sedangkan orang lain hanya dapat membaca dan menjalankan file tersebut
  • drwx—— 700 Hanya pemilik yang dapat mengakses, membaca dan menulis pada direktori tersebut. Setiap direktori harus memiliki hak akses x untuk dapat diakses
  • drwxr-xr-x 755 Isi direktori ini hanya dapat dirubah oleh pemilik, tetapi orang lain dapat membaca isi direktori tersebut
Menggunakan Perintah chmod
Untuk menggunakan chmod, perintahnya adalah:
# chmod hakakses namafile
misalnya:
# chmod 644 coba.txt
perintah tersebut akan mengubah hak akses file coba.txt menjadi seperti berikut:
rw-r–r– 1 postgres postgres 41527 Jul 12 2001 coba.txt
Untuk mengganti hak akses sebuah direktori beserta dengan isinya, gunakan parameter R, dengan parameter tersebut, chmod akan dijalankan secara rekursif, misalnya seluruh file yang ada pada direktori /home/user/public_html akan dirubah hak aksesnya menjadi 755, maka perintahnya adalah sebagai berikut:
# chmod 755 /home/user/public_html
Menggunakan Perintah chown
Perintah chown digunakan untuk mengganti pemilik sebuah file, perintah ini hanya dapat digunakan oleh user root. Perintah ini hanya dapat digunakan oleh user root. Perintahnya adalah sebagai berikut:
# chown namauser.namagrup namafile
misalnya:
# chown user.user coba.txt
perintah chown juga dapat digunakan dengan menggunakan parameter R, contohnya adalah sebagai berikut:
# chown R apache.apache /var/www/html
Perintah chattr
Seringkali secara tidak sengaja kita menghapus atau mengedit sebuah file penting, di dalam Linux tidak ada fasilitas undelete, jadi file yang telah terhapus tidak dapat dikembalikan lagi.
Perintah (program) chattr digunakan untuk melindungi sebuah file sehingga tidak akan dapat dihapus ataupun dirubah dengan perintah apapun. Perintah chattr memberikan atribut i pada file yang dilindungi, perintahnya:
# chattr +i namafile
misal:
# chattr +i penting.txt
setelah perintah tersebut dijalankan, gunakan perintah ls l untuk melihat hasilnya:
jika suatu ketika file ini akan diedit atau dihapus, terlebih dahulu atribut diatas harus dilepas, untuk melepasnya gunakan perintah berikut:
# chattr i namafile
sumber : konsultan linux dan http://www.balivisual.com/view-article-19.html

Kamis, 05 Juni 2014

Fixing Instant Search

Instant Search Problem...! 

Instant Search doesn’t display any results at all, only displays results before a certain date or always shows that there are items left to index. I let it index overnight but nothing has changed.
How can I get it to completely index my messages?
There are a couple of levels at which Instant Search in Outlook 2007, Outlook 2010 and Outlook 2013 can break. You can troubleshoot Instant Search in the mentioned order in this article.

Marked for indexing

First let us check if the pst-file or mailbox has been marked to be indexed.
  • Outlook 2007
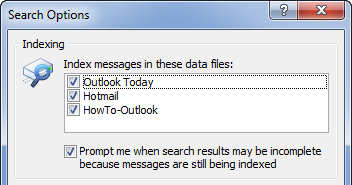
    Tools-> Options-> Search Options… In the Indexing section you can select which data file to index.
  • Outlook 2010
    File-> Options-> section Search-> button Indexing Options…-> button Modify-> expand Microsoft Outlook
    In the list that is shown under Microsoft Outlook, make sure that your pst-file or mailbox is displayed and selected. If it is not listed, you’ll have to recreate your mail profile.
  • Outlook 2013
    File-> Options-> section Search-> button Indexing Options…-> button Modify
    Here, make sure that Outlook is selected.
    Unlike in Outlook 2007 and Outlook 2010, you cannot specify which mailboxes or pst-files in Outlook to index; You either index Outlook or you don’t.
Search Options in Outlook 2007
Locations selected to be indexed in Outlook 2007.

Check for pst-file corruptions

If your pst-file has been marked but Outlook doesn’t display the correct results, it usually means there is some corruption going on in your pst-file. In order to fix these you should scan your pst-file for errors with scanpst.exe. You can find this file in the same folder as outlook.exe or use OutlookTools (free!) to locate it for you.
Once repaired, open Outlook and leave it idle for some time. To see if everything has been indexed now use:
  • Outlook 2007
    Tools-> Instant Search-> Indexing Status
  • Outlook 2010 and Outlook 2013
    Click in the Search field in order to make the Search Tools tab visible in the Ribbon. Here click the Search Tools button and select the Indexing Status…
When you have a big pst-file or mailbox, this indexing could take some time but if the number of items left to index doesn’t change after leaving your computer idle for over 30 minutes, something is wrong still.

Disable and then re-enable the file for indexing

Go back to the Search Options and deselect the data file that is giving you issues. Close Outlook and wait for about 5 minutes and also verify in Task Manager (CTRL+SHIFT+ESC) that on the Processes tab the outlook.exe process actually quits. You might get a lot of disk activity; this is the Search Indexer removing the indexed items from the Index.
After this open Outlook again and go back to the Search Option and select the pst-file we just deselected. Leave the computer idle again and see if it will eventually reach the status of “0 items remaining.”

Rebuild the index

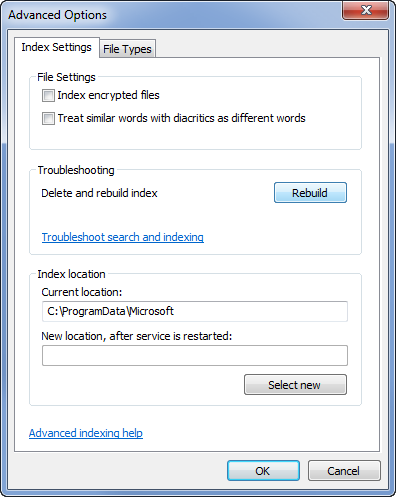
If it doesn’t, it might be that the Index itself has been damaged. In order to reset this, go to Control Panel-> Indexing Options-> Advanced-> button Rebuild
(Type “Indexing” in the Search field of Control Panel to quickly locate the applet.)
This will rebuild the entire Index from scratch and depending on the amount of documents to be indexed, this could take quite long and degrade your system’s performance while the Indexer is still busy. I would recommend to have it rebuild itself overnight.
Advanced Indexing Options in Windows 7
Advanced Indexing Options in Windows 7.

Reset the index

If it still doesn’t work press the “Restore Defaults” button that you can find under the Rebuild button in Windows Vista. The difference with Rebuild is that, aside from resetting all customized indexing settings like indexing location and file type selections, it will recreate the actual Index files as well.
In Windows 7 and Windows 8, you can press the blue “Troubleshoot search and indexing” link. This will start a troubleshooting wizard in which you can select the option “E-mail doesn’t appear in search results”.

Reinstall the Windows Search feature

If your installation of Windows Search got damaged, you can remove and reinstall it in the following way.
  1. Control Panel-> Programs-> Turn Windows features on or off
  2. Deselect: Windows Search
  3. Press OK and wait until the installer is finished.
  4. Reboot your computer.
  5. Repeat the above steps to enable it again.

Rabu, 02 Oktober 2013

Install Windows 7 Menggunakan USB Flashdisk

Manual to Install operating system with usb 

Selama ini saya telah mencoba mencari informasi bagaimana caranya menginstall Windows 7 melalui Flashdisk, dan akhirnya berhasil juga, walaupun prosesnya berjalan agak lambat dan kupikir ngga bakalan juga nih bisa menginstall lewat USB flashdisk, baru2 ini telah banyak artikel yang membahas tentang cara2 menginstall windows melalui USB flashdisk, dan saya pikir gak ada salahnya mencoba trik yang lain, siapa tau ada peningkatan dalam hal kecepatan penginstallannya.
Menginstall Windows melalui USB flashdisk ini ternyata banyak keuntungannya dibanding melalui CD atau DVD disk, Kita tidak perlu khawatir akan CD atau DVD yang ngga kebaca sama CD/DVD-ROM, CD atau DVD yang tergores, kadang menyulitkan dalam proses penginstallan windows, sedangkan melalui Flashdisk itu sendiri, hal yang demikian ngga lah perlu terjadi lagi.
Saya akan menunjukkan cara manual untuk menginstall windows 7 melalui USB FlashDisk
Sebelum kita mulai, perlu disiapkan adalah: Sekurangnya 1buah Flashdisk dengan kapasitan 4Gb ato lebih, soalnya Windows 7 setidaknya mengambil tempat sebesar 3Gb.
diskpart view
Cara Manual:
  1. Colokkan USB Flaskdisk anda. (masukin ke usb port yah, jgn ke tempat lain).
  2. Tekan Tombol WIN+R, ketik cmd dan klik OK.
  3. Ketik diskpart dan tekan ENTER.
  4. Ketik list disk, tekan ENTER dan pilihlah yang mana adalah USB flashdisk anda, hati2 jangan salah pilih nanti salah2 yg keformat adalah disk yang lain. jikalau anda punya hanya 1 harddisk makan USB flaskdisknya adalah disk1.
  5. Ketik select disk 1 dan tekan ENTER.
  6. Ketik clean dan tekan ENTER.
  7. Ketik create partition primary lalu tekan ENTER.
  8. Ketik select partition 1 dan tekan ENTER
  9. Ketik active dan tekan ENTER.
  10. Ketik format fs=fat32 dan tekan ENTER
  11. Ketik assign dan tekan ENTER
  12. Ketik exit dan tekan ENTER.
  13. Masukkan disk DVD windows 7  dan copy lah semua isi DVD tadi ke USB Flaskdisk anda.
  14. Booting komputer anda melalu USB Flashdisk, setting malalui bios komputer anda, pastikan boot nya melalui USB Flashdisk, apabila langkah2nya betul, maka proses instalasi windows seharusnya berjalan melalui USB Flashdisk.

Senin, 02 September 2013

Fix Slow Outlook 2003-2007 Loading Dataset Problem

Microsoft Outlook 2007 running super slow? Still loading dataset for you? I just love it when Microsoft tries to make their software better by adding a crapload of useless features to them! I have no idea why it would take 8 hours to load a single dataset! I don’t even know what the heck the dataset is supposed to be! We’re just talking email here right?
Unfortunately, making sense and talking about Micorsoft products at the same time is usually not possible, so you’ll just have to live with the fact that each newer version of Windows and Office is only going to slow your computer down eve more!
So if you’re in the middle of checking your email or creating a new rule and suddenly everything grinds to a halt with “loading dataset” showing up in the status bar, you’ll have to take some harsh actions against Outlook if you ever want to be able to do any work.
Here’s a couple of ways you can speed up Outlook 2007 and hopefully get rid of that annoying loading dataset message:

1. Disable Useless Outlook Add-ins

Yes, they are useless, except for one maybe. In order to disable all of the add-ons that are active by default, you’ll need to open Outlook 2007 in Administrative mode.
First, go to C:\Programs\Microsoft Office\Office12, right click on the Outlook.exe program and choose “Run as Administrator”.
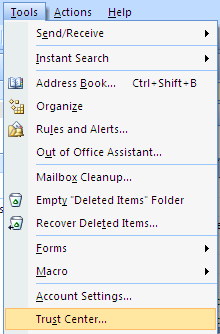
Then, once Outlook loads, go to Tools from the top menu and then Trust Center.
tools trust cente
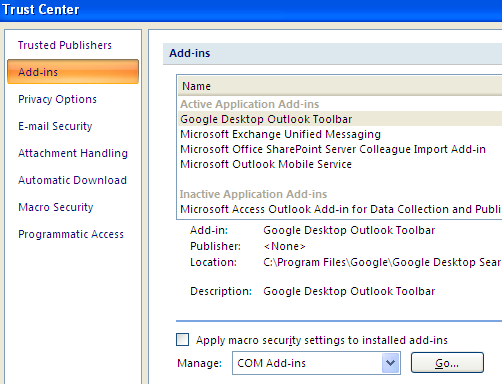
Click on Add-ins in the left hand menu and then click on the Go button at the very bottom of the dialog where it says Manage and has a drop down box.
trust center
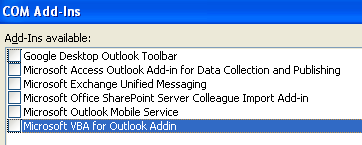
Now you’ll get a list of add-ins that you can uncheck. It is suggest that you un-check ALL of the add-ins except for the Windows Indexing.
add ins outlook
Go ahead and choose the other option in the drop-down box, which is Exchange Client Extensions. Do not disable the Exchange add-ins if you’re connected to a corporate network.
This one change significantly increased the speed of my Outlook 2007 installation. It also helped to reduce the number of instances of loading dataset.

2. Disable RSS feeds in Outlook 2007

Another annoying default setting in Outlook 2007 is the fact that it has a good number of RSS feeds that come pre-configured and that eat up resources in terms of synchronization. Outlook will keep checking for updates to these feeds and therefore slow things down even more. If you use another reader for your RSS feeds, like Google Reader, make sure to remove the RSS feeds from Outlook 2007.
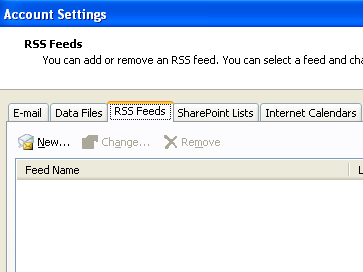
In Outlook 2007, go to Tools, Account Settings and then click on RSS Feeds.
outlook rss feeds
As you can see, I’ve removed all of my RSS feeds so that no CPU power is being used up for this purpose! Just click the remove button for each RSS feed listed.

3. Compact your Outlook.pst personal folder

One other thing you can do to speed up Outlook 2007 is the compact your email folders so that they are not as large. It’s best to delete out any emails with large attachments or even to archive some emails if your file is larger than 1GB.
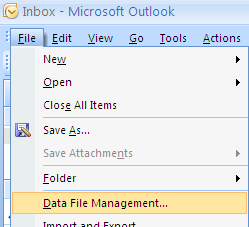
In Outlook 2007, click on File and then Data File Management.
data file management
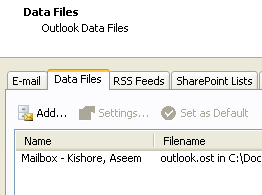
Click on the Data Files tab and then double-click on the data file that you wan to compact.
data file outlook
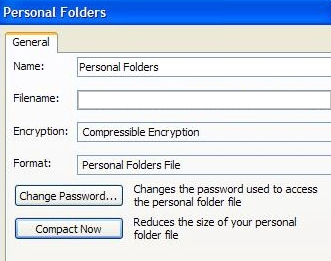
Now go ahead and click on the Compact Now button to reduce the size of the personal folder file.
compact data file
That’s all of the methods I could figure out so far! If you know of any other method that will help speed up the super slow Outlook 2007, do post a comment and let us know! Hope it helps! Enjoy!

article from: http://www.online-tech-tips.com

Senin, 22 Juli 2013

Generic Host For Win32 Processor Service


Cara AMPUH Membersihkan Virus Generic Host For Win32 Processor Service


Sebelum menuju Cara Membersihkan  For Win32 Virus Generic Host Processor, saya mau cerita dulu, Beberapa hari yang lalau, saat saya mau meng - share dokumen tiba - tiba koneksi internet saya terputus. Dan agar supaya bisa konek dengan internet lagi jalan satu - satunya saya harus me-restart computer. Dan mungkin sobat juga pernah mengalami di layar monitor muncul pesan Generic Host Process for win32 services. Jika kita tekan ( klik ) ” Don’t send ” maka yang terjadi adalah koneksi internet kita akan langsung terputus dan tidak bisa di koneksikan kembali. Agar supaya bisa konek dengan internet lagi dengan jalan restart komputer sobat, baru sobat bisa koneksi dengan internet dan bisa dijalankan kembali.

Tapi setelah sobat terkoneksi kembali biasanya selang beberapa menit pesan itu akan muncul kembali, begitu seterus nya. Tapi bila tekan ” Don’t Send ” beberapa waktu kemudian juga akan terpututs juga koneksi internet kita. Huh… sama saja dong. Penyebab Hal ini terjadi karena sistem windows 32 kompi kita sedang di satroni Malware. Nah sekedar berbagi Tips Membersihkan Virus Generic Host Process for Win32 Services, Perhatikan caranya sobat karena bila tidak mengikuti resiko di tanggung penumpang.

Download FixDownadup.exe ]>>
Download Patch Microsoft Windows XP ]>>
  1. Download dulu 2 software ampuh di atas!! Setelah 2 file tersebut berhasil di download, sobat restart komputer dan masuk ke safe mode.
  2. untuk masuk safe mode tekan F8 ( untuk biosnya biasanya settingannya CDROOM dulu baru Hardisk terus Floppy ).
  3. Setelah masuk ke safe mode Loginlah sebagai administrator.
  4. Kemudian jalankan FixDownadup.exe atau antivirus bikinan Symantec tersebut, Tekan start agar antivirus mulai melakukan tugasnya untuk scanning virus ( Tunggu sampai proses scanning selesai ).
  5. Kalau berhasil akan ada laporan berupa file notepad yang berisi info bahwa komputer kamu sekarang telah bebas virus.
  6. Restart lagi PC dan masuk ke windows biasa ( bukan safe mode ) dan installah patch dari microsoft WindowsXP-KB958644-x86-ENU.exe.
  7. Restart Pc dan proses pembersihan telah selesai.
  8. setelah itu Lakukan penginstalan ANTIVIRUS, seperti AVG, Avira dll,... ( karena kalau tidak virus akan kembali lagi - kembali lagi.
  9. Jika suatu ketika muncul lagi virus generic host-nya, tinggal scan dengan FixDownadup.exe ( dengan langkah diatas pada safe mode ) maka komputer akan bersih kembali.
  10. Kalau melakukan scan dengan FixDownadup.exe tidak pada safe mode takutnya akan ada efek tertentu yang akan ditimbulkan.
  11. Sampai disini dulu sharing untuk cara membersihkan Virus Generic Host Process for Win32 Services. Semoga dapat bermanfaat dan bisa memperluas ilmu dengan mengamalkannya.
Semoga tips Membersihkan Virus Generi yang paling Ampuh ini bisa bermanfaat


Sumber : http://kolombloggratis.blogspot.com/2011/02/tips-cara-membersihkan-virus-generic.html#ixzz2ZjlGy9Jk

Jumat, 19 Juli 2013

resolve the problem 'Generic Host Process for Win32'

Generic Host Process for Win32 Services has encountered a problem and needs to close.


solve 1:

Update 894391

and Update 921883

after you have downloaded and installed these manually 
reboot ur comp and keep updateing ur computers with windows updates


solve 2:

This issue could be conflict of flees between HP software and the Operating System. 

Disabling Windows Image Acquisition (WIA) in Windows XP will resolve the issue.

Please perform the below steps to resole the issue:

  1. From the Window Desktop, click Start, and then click ControlPanel. The Control Panel will open. 
  2. Double-click the Administrative Tools icon. The Administrative Tools window will open. 
  3. Double-click the Services icon. The Services window will open. 
  4. Double-click the Windows Image Acquisition (WIA) icon. The Windows Image Acquisition (WIA) Properties   (Local Machine) windows will open. 
  5. On the General tab, click the drop-down arrow in the Start-up Type box and select Disabled. 
  6. Click Stop. A window will open with a message stating the service is being found. When the message closes, verify the ServiceStatus displays Stopped. Repeat this step if necessary. 
  7. Click Apply, and then click OK.

Jumat, 24 Mei 2013

Solusi masalah d3dx9_30.dll

Bagi kalian yang menemu masalahseperti pada gambar, lanjutkan membaca, kalau tidak , , ya tidak usah dibaca , , , hehe


Download dulu file di bawah:
DOWNLOAD 1 mb

Extrak pada aplikasi yang membutuhkan, atau pada 
C:\WINDOWS\system32 coba jalankan aplikasi yang butuh barusan pasti bisa.

sebenarnya ini file DirectX (mungkin) yang dibutuhkan dalam bermain game, sedangkan game itu gak memiliki filenya, atau pun os kita sendiri yang gak punya.


Semoga solusi yang Ghesa berikan bisa membantu. thz

Selasa, 21 Mei 2013

Configuring the Outook Gmail settings


You can configure Outlook to handle your Gmail account as a POP3 or as an IMAP account. Depending on your choice, you have to enable the related account option in your Gmail account (Gmail Settings -> Forwarding and POP/IMAP).

  • Below, we will detail how to setup Microsoft Office Outlook 2000 to 2010 to send, receive and store email messages for a Gmail address. Before getting started, please make sure you know your Gmail email address and your Gmail password.
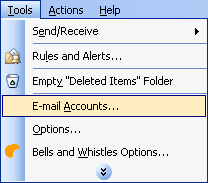
  • Start Outlook: from the main Outlook window, go to Tools -> Email Accounts.
    selecting the Outlook email accounts for Gmail

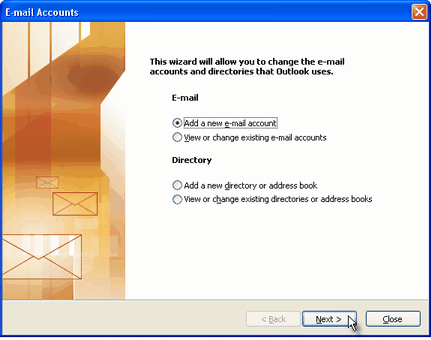
    On the Outlook popup window, select to "Add a new e-mail account" and click on Next.
    Outlook add email account

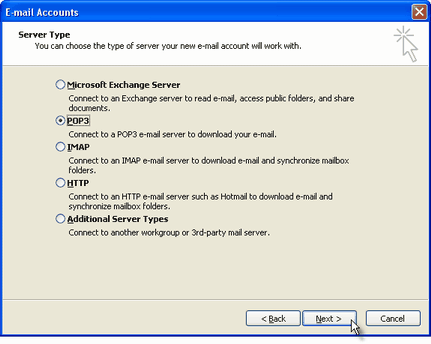
    On the server type step, select POP3 or IMAP (depending on your needs) for the Outlook email account type, then click on Next. There is no need to select the IMAP type, because the Gmail web based account will anyway keep a copy of all emails, just like an IMAP account would do.
    gmail pop3 for outlook

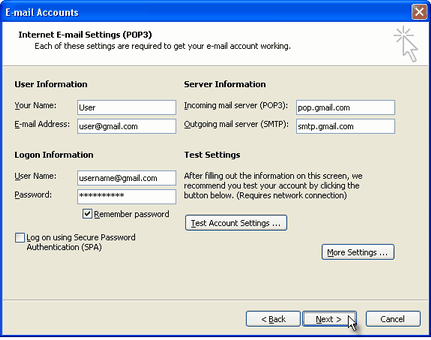
    On the next screen, you will have to specify your Outlook Gmail settings, such as your Gmail username and password, Gmail server addresses, Gmail server ports and Outlook Gmail display name.
  • On the User Information section, enter your Name (it can be anything, but remember this is going to be the name/text that people will see when you will send them an email via your Outlook Gmail account) and your Gmail email address.

  • On the Server Information section, enter the Google Gmail servers: 

    POP Gmail servers for Outlook: 
    - Incoming mail server: pop.gmail.com 
    - Outgoing mail server: smtp.gmail.com. 

    IMAP Gmail server for Outlook: 
    - Incoming mail server: imap.gmail.com 
    - Outgoing mail server: smtp.gmail.com. 

    As an alternative, you may setup any other outgoing mail server that you have access to, such as your ISP's SMTP server or your own hosted outgoing server. However, if you setup a 3rd party outgoing mail server, you will not have access to sent emails via your web based Gmail account panel. 

  • On the Logon Information section, enter your Gmail User Name (which is the same as your Gmail email address) and your Gmail password. Tick the box "Remember password" in order to make Outlook to store the Gmail password, so it will not ask you about it every time when Outlook will send/receive emails for the Gmail account.

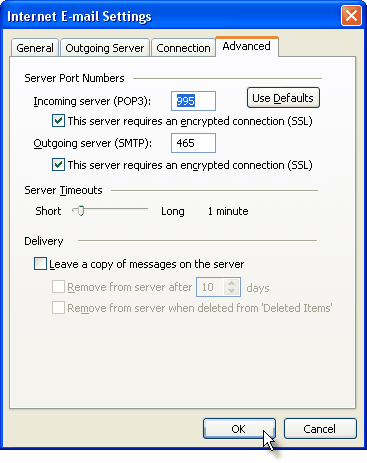
  • Click on the "More Settings" button and go to the "Advanced" window tab. 

    If you use Gmail as a POP Outlook account: 
    - On the "Incoming server (POP3)" field, enter 995 and mark the box "This server requires an encrypted connection (SSL)"; 
    - On the "Outgoing server (SMTP)" field, enter 465 and mark the box "This server requires an encrypted connection (SSL)". 

    If you use Gmail as an IMAP Outlook account: 
    - On the "Incoming server (IMAP)" field, enter 993 and mark the box "This server requires an encrypted connection (SSL)"; 
    - On the "Outgoing server (SMTP)" field, enter 587 and mark the box "This server requires an encrypted connection (TLS)". 

    For both POP and IMAP, you also have to enable the option "My outgoing mail server requires authentication" from the Outgoing Server tab. 

    You can also change the server timeouts period: this defines the time interval for which Outlook will wait to establish a Gmail connection, before triggering a connection error. The slower your Internet connection is, the greater period you should put. 
    The "Delivery" options are not important for an Outlook Gmail account: no matter what you would change here, Gmail will always keep a copy of each email on the Gmail server. 

    outlook gmail servers 
    When you are done setting up your Outlook Gmail advanced settings, click on OK to return to the Outlook Gmail account window. 

    gmail for outlook

    To verify your Outlook Gmail setup, click on the "Test Account Settings" button: this will make Outlook to attempt to login to your Gmail account and to send & receive an Outlook test email. If the test will succeed, you will notice the test email in your Outlook Inbox folder. If the test fails, Outlook will prompt you with the error messages - most likely, you didn't setup the correct server settings or the Gmail password is wrong.
  • Rabu, 15 Mei 2013

    Adobe Acrobat: Application is being terminated because of memory corruption

    When a user finds that they get the following error message when closing Adobe Acrobat:
    Application is being terminated because of memory corruption
    or when they try to open a PDF file on the web, you can view it for a short time and it then disappears, you can apply this fix:
    When you remove files from the Acrobat Organizer folder, you force Acrobat to rebuild the Organizer database. This process replaces any damaged files in the Organizer that may be causing the error message.
    To remove the files from the Acrobat Organizer folder:
    1. Choose Start > Run.
    2. In the Open text box, type: %UserProfile%\Application Data\Adobe\Acrobat\7.0\Organizer70.
    3. Delete or move all files from this directory.


    Selasa, 14 Mei 2013

    Mengenal Gejala dan Penyebab Komputer Sering Restart Sendiri


    Akhir-akhir ini, sering sekali muncul pertanyaan “mengapa komputer saya sering merestart ?” dan hampir dari setiap pertanyaan itu tidak disertakan gejala dan penyebabnya. Maka dari itu, saya mencoba menerka jawaban pertanyaan itu berdasarkan pengalaman saya.
    Ada beberapa faktor yang menyebabkan komputer sering merestart. Berikut adalah analisa saya berdasarkan apa yang telah saya alami :
    1. kalau disebabkan virus, gejalanya komputer akan merestart setelah kita membuka program-program tertentu... misal kita membuka "CMD" dari run, membuka "windows eksplorer", membuka "msconfig" dan membuka "regedit" dari run, dan lain-lain... dan gejala merestartnya pun seperti kita yang melakukan ( seperti klik start-->Turn off computer-->Restart)...
    solusi :
    • upgrade anti virus
    • cabut hardisk, scan di komputer lain yang antivirusnya bagus
    • install ulang dengan catatan lebih baik diformat drive c:-nya ..dan jangan lupa untuk mematikan system restore, menghapus folder "recycler" (di hidden) setelah melakukan install ulang dan men-scan komputer dengan menggunakan anti virus terbaru
    • OPTIONAL : untuk menghindari terinfeksi virus, bisa dengan menggunakan OS lain seperti LINUX ^_^

    2. kalau disebabkan hardware, ada beberapa gejala lagi :
    2.1 kalau disebabkan karena hardware crash
    gejalanya biasanya muncul blue screen saat kita menjalankan aplikasi (bisa games atau program biasa), biasanya disebabkan pemasangan hardware yang kurang pas atau hadware kotor oleh debu, dan yang lebih parah, biasanya karena memori anda mulai rusak
    solusi : buka casing...pastikan hardware anda terpasang dengan pas, dan bersih dari debu... dan bila memori mulai rusak, cabut memori anda, pasangkan di komputer lain..kalau masih menimbulkan gejala yang sama berarti memang karena memori anda mulai rusak dan mau gak mau anda harus menggantinya dengan yang baru
    2.2 kalau disebabkan karena hardware kurang kompeten
    gejalanya komputer langsung restart tanpa peringatan. biasanya gejala ini terjadi setelah anda menginstallkan vga baru. catatan : vga itu biasanya membutuhkan daya minimal 65 watt dari power supply... selain itu juga biasanya diakibatkan kurangnya daya yang masuk ke komputer anda
    solusi : ganti power supply dengan yang lebih banyak mensupplai listrik ke komputer anda...dan bila diakibatkan kurangnya daya (listrik dari PLN biasanya tegangannya menurun di kota besar pada jam 18:00 - 22:00) gunakan UPS, lumayan buat menstabilkan tegangan yang masuk dan menyimpan daya listrik.

    3. kalau diakibatkan software crash
    gejalanya mirip hardware crash, muncul blue screen..namun bila diperhatikan di bagian bawah peringatan yang muncul itu berbeda dengan yang diakibatkan hardware crash.. biasanya software yang diinstallkan itu ada yang konflik dengan hardware anda. dan biasanya yang konflik itu adalah software yang akan menggunakan hardware anda seperti : benchmarking-tools, games, graphics software, etc.
    solusi : upgrade driver anda, upgrade juga OS anda karena ada OS dengan versi tertentu kurang kompatibel dengan hardware tertentu dan saat dilihat di forum-forum solusinya harus update OS

    4. Disebabkan oleh overheat (new)
    Biasanya komputer restart tiba-tiba tanpa ada peringatan ataupun BSOD, tetapi ada ciri utama yaitu ketika restart kemudian raba di casing komputer di sekitar daerah processor itu suhunya panas.
    solusi : 
    1. pastikan sirkulasi udara (aliran udara masuk dan keluar) di CPU baik atau tidak terhalang
    2. Pastikan settingan BIOS sudah di restore ke default, dikhawatirkan settingan BIOS telah dirubah dan menyebabkan komputer ter-overclok secara tak sengaja.
    3. pastikan pasta processor sewaktu ngerakit telah dipasang dengan benar.. (sangat tidak disarankan untuk mengganti pasta sebelum memastikan kalau sumber masalah adalah overheat)
    4. kalau masalah overheat ini masih berlanjut, lebih baik ganti cooler untuk processornya :D
    kemudian ...
    Belakangan ini sering ada yang nannya, "mas, kenapa kalau lagi main game restart?". Permasalahan ini ada beberapa solusi :
    1. Restart tanpa notifikasi/BlueScreen/BSOD
    Biasanya kalau seperti ini kemungkinan besar permasalahannya di pasokan listrik yang kurang beres. Mengapa? karena ketika main game, semua hardware bekerja maksimal yang mengakibatkan konsumsi listrik meningkat. Biasanya hal ini terjadi pada komputer dengan VGA add-on/outboard. FYI, VGA add-on apalagi yang mid-end keatas membutuhkan listrik yang tidak sedikit. Biasanya di requirement VGA nya disebutkan minimal PSU harus berapa watt. Dan catatan, PSU bawaan casing tidak akan sebagus PSU khusus yang dibeli secara terpisah.
    Solusi : pastikan listrik stabil(tidak naik turun) dengan menggunakan stabilizer yang pake active motor regulator. Kalau masih restart, kemungkinan PSU nya harus tambah daya
    2. Restart dengan notifikasi/BlueScreen/BSOD
    Maksudnya notifikasi ini apa mas? maksudnya setelah sebelumnya restart kemudian dinyalaken lagi PC nya trus ada tulisan " ... serius error" (lupa :D ). Biasanya ini disebabkan oleh Software atau hardware crash. Kalau software crash biasanya ada konflik driver VGA, driver VGA yang tak uptodate atau di windowsnya sendiri ada error. Kalau Hardware crash, biasanya memori atau vga kurang pas masangnya atau berdebu.
    solusi : update driver, pastiken semua hardware terpasang dengan benar, komputer bebas debu

    Tips and Trik