Senin, 15 Juli 2013

Pengenalan RAM, ROM dan Fungsinya

Langsung aja deh,berikut ini sedikit referensi penjelasan apa itu ram, rom dan juga fungsinya.  

#RAM

RAM singkatan dari Random Acces Memory terdiri dari sekumpulan chip-chip yang berhubungan (klo tidak berhubungan gak bakalan bisa dipake :p). Penggunaan atau fungsi dari RAM itu sendiri adalah untuk menampung semua data yang akan diproses, instruksi-intruksi program untuk memproses data, data yang telah diproses dan sedang menunggu untuk dikirim sebagai output, serta juga menampung instruksi sistem operasi pengontrol fungsi dasar dari komputer.


Di dalam RAM semua data dan instruksi ditampung secara temporer (tidak permanen), tergantung dengan data yang diproses. Ketika RAM dicabut dari Mainboard saat daya mati maka semua data dan instruksi yang ada di dalamnya akan hilang secara permanen.

Kapasitas RAM sangat bervariasi dalam komputer, dalam hal ini kapasitas memory ram sangat penting karena menentukan seberapa banyak data yang bisa diproses dalam waktu yang sama dan seberapa besar program yang bisa menempatinya. Sistem operasi komputerlah yang bertugas membagi penggunaan RAM agar bisa menjalankan program dengan baik.(klo sempet saya akan posting juga perkembangan RAM di indonesia saat ini,itu aja kalo sempet..hehe) 


#ROM

Bisa dikatakan Read Only Memory (ROM) yaitu merupakan kumpulan chip yang berisi bagian dari sistem operasi yang dibutuhkan saat komputer dinyalakan. ROM tidak dapat ditulisi atau diubah isinya oleh pengguna. ROM dibuat dengan sistem instruksi dan program yang sudah disimpan dan diisikan oleh pabrik pembuatnya. Untuk mengganti isinya adalah dengan menggantinya dengan ROM yang baru.

ROM biasa digunakan dalam komputer untuk penyimpan BIOS (Basic Input Output System). BIOS merupakan bagian yang sangat kritis dari suatu sistem operasi, yang berfungsi memberi tahu bagaimana caranya dapat mengakses disk drive. Saat komputer dinyalakan dalam kondisi RAM masih kosong maka instruksi pada ROM BIOS yang digunakan oleh CPU, komputer kemudian baru memindahkan file-file tersebut ke dalam RAM dan menjalankannya.


Itu aja yang bisa saya jelaskan tentang apa itu RAM dan ROM, mungkin juga bisa dibilang Perbedaan RAM dan ROM.


ehm.. 

- butuh referensi tentang jenis-jenis Memory RAM ato enggak ya ??

- ya uda kali aja butuh :d

mau tahu sekallian perkembangan RAM saat ini

Rabu, 29 Mei 2013

Cara Memperbaiki Windows Installer Error

Mendapat sebuah program dari teman yang baru saja mengikuti pelatihan multimedia adalah kebahagiaan bagi saya. Segera saja pasang kepingan CD tersebut ke CD Drive laptop kesayangan. Folder software exe. saya buka untuk memulai meng-install program tersebut. Menunggu beberapa saat sambil minum kopi kental :) akhirnya muncul kabar buruk dari windows. Saya tidak tahu artinya, yang jelas munculnya seperti gambar di bawah ini :
Kecewa dan sedih mengingat tak bisa segera menikmati software baru. Saya buka google engine untuk menemukan pemecahan masalah windows installer Error. http://www.soft-krim.co.ccmemberikan salahsatu materinya. Saya terapkan tetapi ternyata masih error juga. Akhirnya saya melakukan langkah nekad seperti di bawah ini:
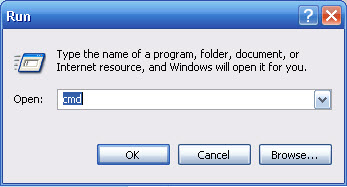
  • Jalankan menu START >> RUN
  • Ketikkan CMD
  • Klik OK
  • Ketikkan msiexec/unregister lalu tekan keyboard ENTER. Seperti gambar di bawah ini
  • Lalu saya  coba dengan reinstall service Windows Installer dengan cara mengunduhnya  di sini.
  • Saya menggunakan Windows XP maka sy pun mengunduh seperti system laptop saya, windows XP.
  • Selesai mengunduh saya jalankan windows installer tersebut.
sekarang semuanya berjalan normal kembali. Saya bisa menginstall program tersebut di laptop saya. Semoga bermanfaat.

Jumat, 24 Mei 2013

Solusi masalah d3dx9_30.dll

Bagi kalian yang menemu masalahseperti pada gambar, lanjutkan membaca, kalau tidak , , ya tidak usah dibaca , , , hehe


Download dulu file di bawah:
DOWNLOAD 1 mb

Extrak pada aplikasi yang membutuhkan, atau pada 
C:\WINDOWS\system32 coba jalankan aplikasi yang butuh barusan pasti bisa.

sebenarnya ini file DirectX (mungkin) yang dibutuhkan dalam bermain game, sedangkan game itu gak memiliki filenya, atau pun os kita sendiri yang gak punya.


Semoga solusi yang Ghesa berikan bisa membantu. thz

Selasa, 21 Mei 2013

Configuring the Outook Gmail settings


You can configure Outlook to handle your Gmail account as a POP3 or as an IMAP account. Depending on your choice, you have to enable the related account option in your Gmail account (Gmail Settings -> Forwarding and POP/IMAP).

  • Below, we will detail how to setup Microsoft Office Outlook 2000 to 2010 to send, receive and store email messages for a Gmail address. Before getting started, please make sure you know your Gmail email address and your Gmail password.
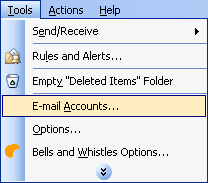
  • Start Outlook: from the main Outlook window, go to Tools -> Email Accounts.
    selecting the Outlook email accounts for Gmail

    On the Outlook popup window, select to "Add a new e-mail account" and click on Next.
    Outlook add email account

    On the server type step, select POP3 or IMAP (depending on your needs) for the Outlook email account type, then click on Next. There is no need to select the IMAP type, because the Gmail web based account will anyway keep a copy of all emails, just like an IMAP account would do.
    gmail pop3 for outlook

    On the next screen, you will have to specify your Outlook Gmail settings, such as your Gmail username and password, Gmail server addresses, Gmail server ports and Outlook Gmail display name.
  • On the User Information section, enter your Name (it can be anything, but remember this is going to be the name/text that people will see when you will send them an email via your Outlook Gmail account) and your Gmail email address.

  • On the Server Information section, enter the Google Gmail servers: 

    POP Gmail servers for Outlook: 
    - Incoming mail server: pop.gmail.com 
    - Outgoing mail server: smtp.gmail.com. 

    IMAP Gmail server for Outlook: 
    - Incoming mail server: imap.gmail.com 
    - Outgoing mail server: smtp.gmail.com. 

    As an alternative, you may setup any other outgoing mail server that you have access to, such as your ISP's SMTP server or your own hosted outgoing server. However, if you setup a 3rd party outgoing mail server, you will not have access to sent emails via your web based Gmail account panel. 

  • On the Logon Information section, enter your Gmail User Name (which is the same as your Gmail email address) and your Gmail password. Tick the box "Remember password" in order to make Outlook to store the Gmail password, so it will not ask you about it every time when Outlook will send/receive emails for the Gmail account.

  • Click on the "More Settings" button and go to the "Advanced" window tab. 

    If you use Gmail as a POP Outlook account: 
    - On the "Incoming server (POP3)" field, enter 995 and mark the box "This server requires an encrypted connection (SSL)"; 
    - On the "Outgoing server (SMTP)" field, enter 465 and mark the box "This server requires an encrypted connection (SSL)". 

    If you use Gmail as an IMAP Outlook account: 
    - On the "Incoming server (IMAP)" field, enter 993 and mark the box "This server requires an encrypted connection (SSL)"; 
    - On the "Outgoing server (SMTP)" field, enter 587 and mark the box "This server requires an encrypted connection (TLS)". 

    For both POP and IMAP, you also have to enable the option "My outgoing mail server requires authentication" from the Outgoing Server tab. 

    You can also change the server timeouts period: this defines the time interval for which Outlook will wait to establish a Gmail connection, before triggering a connection error. The slower your Internet connection is, the greater period you should put. 
    The "Delivery" options are not important for an Outlook Gmail account: no matter what you would change here, Gmail will always keep a copy of each email on the Gmail server. 

    outlook gmail servers 
    When you are done setting up your Outlook Gmail advanced settings, click on OK to return to the Outlook Gmail account window. 

    gmail for outlook

    To verify your Outlook Gmail setup, click on the "Test Account Settings" button: this will make Outlook to attempt to login to your Gmail account and to send & receive an Outlook test email. If the test will succeed, you will notice the test email in your Outlook Inbox folder. If the test fails, Outlook will prompt you with the error messages - most likely, you didn't setup the correct server settings or the Gmail password is wrong.
  • Tips and Trik